|
|
|
|
|
WIGO - Wireless Internet on the Go |
|

|
|

|
Product Description |
|
WIGO offers portable broadband wireless technology that enables unprecedented level of high-speed services! WIGO is delivered to you via a portable and a small size device that is free from phone and electrical wire connections! |
|
|

|
|
|
|

|
Currently two types of low-cost plug-and-play connection devices are available: |
|
|
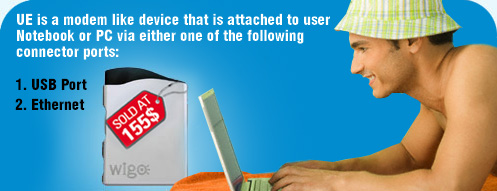
1. User Equipment (UE) |
|
|
|
|
|
|
|
|
This new Modem (WIGO P1D) is also portable as:
Exceptionally portable (115Grams and 10x8.5 cm only), can fit in your pocket,
Replaceable and rechargable battery that lasts upto 2Hrs, New Look if conneceted via USB you can selfpower it from your Laptop....
NEW PRICES!
USB: 155$+VAT
Ethernet: 155$+VAT
| |
|
2. PCMCIA Card
|
|
|
|
|
|
|

|
|
Neither electrical wire nor phone cable are need for the PCMCIA card in order for it to be operational.
This is useful mainly for laptop owners who wants to move between business and home
|
|
|
|
NEW PRICES!
PCMCIA + Converter: 120$+VAT
PCMCIA + 3G Wireless Router: 155$+VAT
PCMCIA + 3G Wireless Router + Converter: 175$+VAT
|
| |
|
|
Service Packages...
|
|
|
|
|
| Packages |
|
Plan 1 |
|
Plan 2 |
|
Plan 3 |
|
Plan 4 |
|
Plan 5 |
| Download |
|
256 kbps |
|
512 kbps |
|
1024 kbps |
|
1024 kbps |
|
1024 kbps |
|
| Upload |
|
up to 64 kbps |
|
up to 128 kbps |
|
up to 128 kbps |
|
up to 128 kbps |
|
up to 128 kbps |
|
| Traffic |
|
1 GB
shared between
upload & download.
Max. Up=200 MB
Unlimited Traffic Daily from 12 Midnight till 8AM |
|
3 GBytes
shared
between
upload & download.
Max. Up = 600 MB
Unlimited Traffic Daily from 12 Midnight till 8AM
|
|
5 GBytes
shared
between
upload & download.
Max. Up = 1 GB
Unlimited Traffic Daily from 12 Midnight till 8AM
|
|
7 GBytes
shared
between
upload & download.
Max. Up = 1.4 GB
Unlimited Traffic Daily from 12 Midnight till 8AM
|
|
2 GBytes shared between upload & download.
Max. Up = 400 MB
|
|
| Cycle |
|
1 Month |
|
1 Month |
|
1 Month |
|
1 Month |
|
180days |
|
| Fees |
|
$16+VAT |
|
$25+VAT |
|
$35+VAT |
|
$45+VAT |
|
$30+VAT | |
|
NEW PRICES!
Ethernet cable: 20$ + VAT
USB cable: 20$ + VAT
Power Adapter: 20$ + VAT
| | |
| |
|
|
Subscription |
|
|
|
Currently WIGO is available from the following ISPs.
To subscribe for WIGO, just contact your preferred ISP: |
|

|
|
|
|
Support |
|
|
First level support/ troubleshooting are done by your chosen ISP. Therefore in case you encounter any problem with WIGO performance kindly contact your ISP and their support team will coordinate with Cable Ones technical team for a quick intervention when required. |
|
|
|
|
|
Installation |
|
|
|

|
WIGO Windows Software Installation Support |

| |
|
How to connect your WIGO Modem to a Windows PC via either USB, PPPoE or PCMCIA
To connect your WIGO modem to a Windows PC, your computer must be using one of the following supported operating systems.
- Windows 98 Second Edition,
- Windows Millennium,
- Windows 2000
- Windows XP
-Windows Vista
All the software you require to install the modem using either a USB, PPPoE or PCMCIA connection is provided on the WIGO Client Software Windows Installation CD.
The windows installation software uses an Install Wizard that will guide you through the installation process. You will be asked to make selections on some of the installation screens.
Please be sure that your computer meets the minimum requirements before you begin the installation.
|
|
1. |
Close all programs that may be running on your PC |
|
|
|
|
|
|
2. |
Insert the CD into the CD-ROM drive on your computer. |
|
|
|
|
|
|
3. |
The Windows operating system should detect the CD and start the installation
program. If the installation program does not start automatically, open
Windows Explorer and then choose My Computer and select your CD drive to
view the contents of the CD. Double-click the 'Setup.exe' program to begin the
installation. The Install Wizard will then guide you through the installation
screens. |
|
|
|
|
|
|
4. |
Follow the on-screen prompts to complete the installation | | |
|
|
|
|
|
|
|
WIGO Apple Macintosh Software Installation Support |

| |
|
How to connect your WIGO Modem to an Apple MAC with a PPPoE interface (connections via USB and PCMCIA are not directly supported by WIGO although drivers may be available elsewhere on the internet).
To connect your WIGO modem to an Apple Mac computer, you should not need any further software to be installed as the connection can be made using the standard Apple Mac Ethernet software with the proprietary PPPoE cable.
To make use of this connection method you will require:
|
|
a. |
A proprietary Ethernet cable (Modem to RJ45 connector) which your operator
may have provided with the sales pack (or can be obtained from your opera
tor), and |
|
|
|
|
|
|
b. |
To configure the modem so it sends the appropriate network authentication
information. |
|
|
|
|
As an aid for the set-up, do the following:
|
|
1. |
Ensure the modem has been pre-provisioned with the Network access username & password. The reason behind this is the modem has 2-levels of authentication - Network and ISP.
If the connection was via a USB cable with the standard WIGO dialer software you would see the two tabs on the WIGO windows application where you enter the "Network" & "ISP" password. However, with a PPPoE client (Mac, Router, Linux) you only have the option to enter the "ISP" username and password, therefore for the Network side authentication the information needs to be pre-provisioned and stored in the modem memory.
There are two ways to do this:
|
a. |
The operator has pre-provisioned the modem beforehand or, |
|
|
|
|
b. |
Connect the modem with a Windows PC using the standard way and then use the WIGO dialler application with either the USB or PPPoE interface. The reason for doing this is so that you will be able to connect to the Registration server and at the end of the registration process the Windows PC automatically writes the network authentication username/password information to the modem. Once this is completed you can change the modem back to the Mac PC |
|
|
|
2. |
If the username/passwords are accepted, you will need to connect the modem to Mac with the modem Ethernet cable. Turn the modem on, then off and then on again (the modem will automatically detect it needs to switch to Ethernet mode and use the PPPoE protocol as opposed to USB protocol). |
|
|
|
|
|
|
3. |
Configure the Mac PC Built in Ethernet connection. To do this use the system preferences/internet & network/network window (This example is based upon MAC OS9). Then
- Set the location field - this could be any free text
- Set the show field to - built in Ethernet
- On the TCP/IP tab set the configure field to - Using PPP
- On the PPPoE tab set the account name to - your ISP user name
- On the PPPoE tab set the password to - your ISP password
- On the PPPoE tab select "connect using PPPoE", "Save Password"
and the "Show PPPoE status" buttons
- Set Apply Now |
|
|
|
|
|
|
4. |
If all is ok, you should be able to connect without having to make further changes to the Mac, as the modem connects you should see the status information indicating progress etc. idle -> contacting PPPserver -> establishing connection -> authenticating user -> connected to |
| |
|
|
|
|
WIGO Linux Software Installation Support |

| |
|
How to connect your WIGO Modem to a Linux PC with a PPPoE interface (connections via USB and PCMCIA are not directly supported by WIGO although drivers may be available elsewhere on the internet).
To connect your WIGO modem to a Linux PC (based on using Red Hat 9), you should not need any further software as the connection can be made via PPPoE, which usually means you can use the in-built Linux PC Ethernet client software.
To make use of this connection method you will require:
|
|
a. |
A proprietary Ethernet cable (Modem to RJ45 connector) which your operator may have provided with the sales pack (or can be obtained from your operator), and |
|
|
|
|
|
|
b. |
To configure the modem so it sends the appropriate network authentication information. |
|
|
|
|
As an aid for the set-up, do the following:
|
|
1. |
Ensure the modem has been pre-provisioned with the Network access username & password. The reason behind this is the modem has 2-levels of authentication - Network and ISP.
If the connection was via a USB cable with the standard WIGO dialer software you would see the two tabs on the WIGO windows application where you enter the "Network" & "ISP" password. However, with a PPPoE client (Linux, Mac, Router) you only have the option to enter the "ISP" username and password, therefore for the Network side authentication the information needs to be pre-provisioned and stored in the modem memory.
There are two ways to do this:
|
a. |
The operator has pre-provisioned the modem beforehand or, |
|
|
|
|
b. |
Connect the modem with a Windows PC using the standard way and then use the WIGO dialer application with either the USB or PPPoE interface. The reason for doing this is so that you will be able to connect to the Registration server and at the end of the registration process the Windows PC automatically writes the network authentication username/password information to the modem. Once this is completed you can change the modem back to the Linux PC |
|
|
| |
|
|
2. |
If the username/passwords are accepted, you will need to connect the modem to a Linux PC with the modem Ethernet cable. Turn the modem on, then off and then on again (the modem will automatically detect it needs to switch to Ethernet mode and use the PPPoE protocol as opposed to USB protocol). |
|
|
|
|
|
|
3. |
Configure the Linux PC Built in Ethernet connection. Using Red Hat 9 you will need to configure the Wireless Broadband Modem as an adsl modem. Red Hat 9 ships a command line/script utility as part of the distribution.
|
a. |
Use the adsl-setup shell script which will prompt you for various pieces of information and sets up an /etc/sysconfig/network-scripts/ifcfg-ppp0 configuration script for the adsl-start and adsl-stop scripts. Once adsl-setup has been run, it sets up the modem, pppd and sets the optimal MTU etc. as well. |
|
|
|
|
b. |
To connect a session, use the adsl-start scripts. If all goes well you should see a few dots and "Connected!" |
|
|
c. |
To disconnect the session, use the adsl-stop scripts. |
Diagnosing Connection faults:
|
a. |
If the connection fails you may want to open up the file /var/log/messages with a text editor and have a look at the error messages. You can try searching the internet with the errors text to see if someone has had a similar problem. |
|
|
|
|
b. |
If you're connected but you can't seem to load any web pages etc, open up the file /etc/resolv.conf with a text editor and make sure you have your ISP's name servers properly listed. |
|
|
| | | | | |
 |
|
|
|
|